Trong bài viết này, chúng ta sẽ xem xét giao thức giao tiếp I2C với ESP32 bằng Arduino IDE: cách chọn chân I2C, kết nối nhiều thiết bị I2C với cùng một bus và cách sử dụng hai giao diện bus I2C.
>> Xem thêm: [PDF] Lập trình Arduino là gì? Tài liệu học Arduino miễn phí 2021
Mục lục
Giới thiệu về giao thức truyền thông I2C trên ESP32:
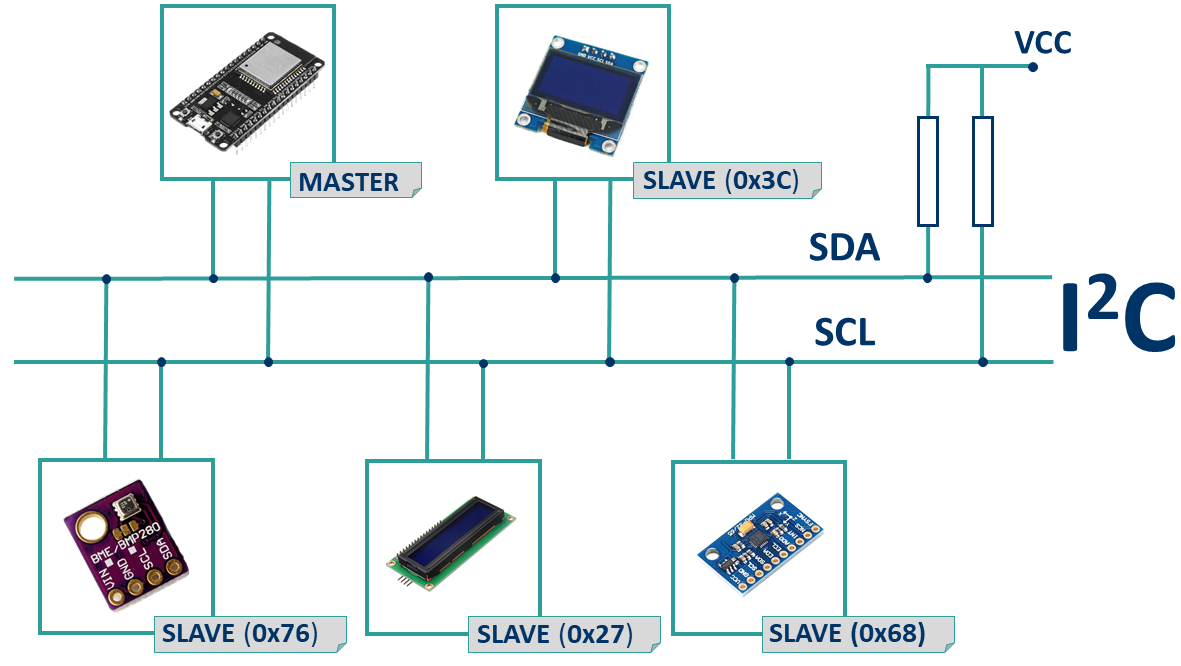
I2C là giao thức truyền thông nối tiếp đồng bộ phổ biến hiện nay, được sử dụng rộng rãi trong việc kết nối nhiều IC với nhau, hay kết nối giữa IC và các ngoại vi với tốc độ thấp. Giao tiếp I2C sử dụng 2 dây để kết nối là SCL (Serial Clock) và SDA (Serial Data). Trong đó dây SCL có tác dụng để đồng bộ hóa giữa các thiết bị khi truyền dữ liệu, còn SDA là dây để dữ liệu truyền qua.
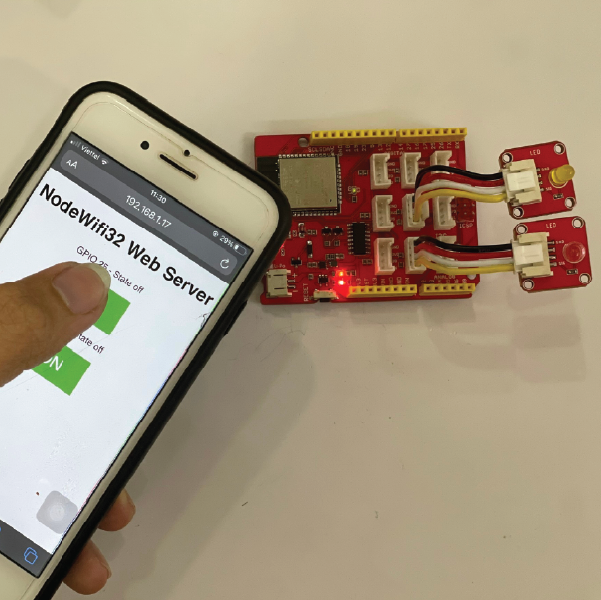
Chúng tôi đã sử dụng giao thức này chung với ESP để giao tiếp với các thiết bị bên ngoài như cảm biến và màn hình. Trong những trường hợp này, ESP là MASTER (Chủ) và những thiết bị khác là SLAVE (Tớ)
Theo như ESP32 datasheet, giao thức I2C của ESP32 hỗ trợ:
- Standard mode (100 Kbit/s)
- Fast mode (400 Kbit/s)
- 7-bit/10-bit addressing mode
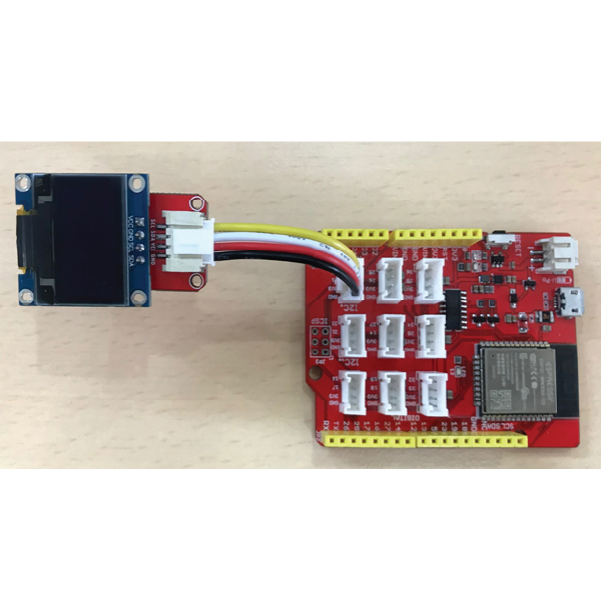
Kết nối thiết bị I2C với Node WiFi 32:

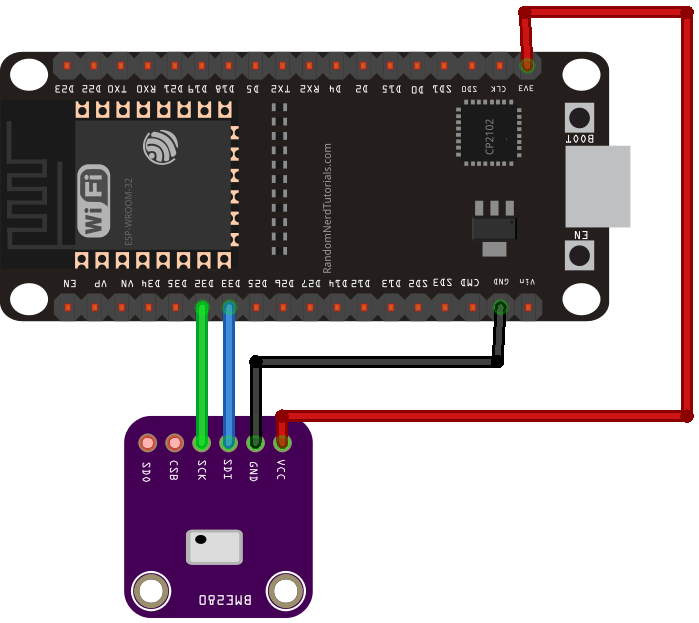
Giao tiếp I2C và ESP32 được hiểu đơn giản là kết nối GND với GND, SDA với SDA, SCL với SCL và nguồn cấp, thường là 3.3V. Bạn có thể tham khảo hình dưới:

Khi sử dụng ESP32 với Arduino, chân I2C mặc định là GPIO 22 (SCL) and GPIO 21 (SDA). Nhưng bạn có thể cấu hình chân để sử dụng bất kỳ chân nào khác.
Scan địa chỉ I2C với Node Wifi32:
Với giao tiếp I2C, mỗi slave trên bus sẽ chứa một địa chỉ riêng của nó. Mã hex đó cho phép giao tiếp với từng thiết bị.
Địa chỉ I2C thường được tìm thấy trên datasheet. Tuy nhiên, bạn có thể scan địa chỉ I2C bằng đoạn code bên dưới:
#include
void setup() {
  Wire.begin();
  Serial.begin(115200);
  Serial.println("\nI2C Scanner");
}
void loop() {
  byte error, address;
  int nDevices;
  Serial.println("Scanning...");
  nDevices = 0;
  for (address = 1; address < 127; address++ ) {
    Wire.beginTransmission(address);
    error = Wire.endTransmission();
    if (error == 0) {
      Serial.print("I2C device found at address 0x");
      if (address < 16) {
        Serial.print("0");
      }
      Serial.println(address, HEX);
      nDevices++;
    }
    else if (error == 4) {
      Serial.print("Unknow error at address 0x");
      if (address < 16) {
        Serial.print("0");
      }
      Serial.println(address, HEX);
    }
  }
  if (nDevices == 0) {
    Serial.println("No I2C devices found\n");
  }
  else {
    Serial.println("done\n");
  }
  delay(5000);
}
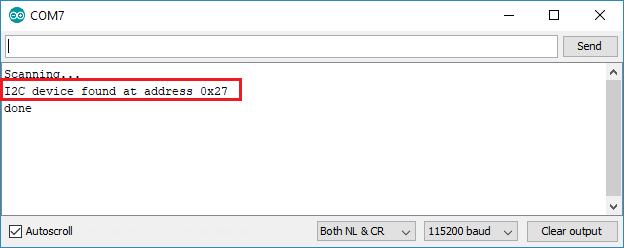
Kết quả scan được của I2C LCD:
Sử dụng những chân I2C khác với Node WiFi 32 (thay đổi chân I2C mặc định):
Khi sử dụng ESP32 với Arduino IDE, hãy sử dụng thư viện Wire.h để giao tiếp I2C. Với thư viện này, bạn khởi tạo I2C như sau:
Wire.begin(I2C_SDA, I2C_SCL);
Vì vậy, bạn chỉ cần đặt GPIO SDA và SCL mong muốn của mình trên các biến I2C_SDA và I2C_SCL.
Ví dụ dưới đây dùng để giao tiếp BME280 sử dụng các chân khác, ví dụ GPIO 33 là SDA và GPIO 32 là SCL:
#include
#include
#include
#define I2C_SDA 33
#define I2C_SCL 32
#define SEALEVELPRESSURE_HPA (1013.25)
TwoWire I2CBME = TwoWire(0);
Adafruit_BME280 bme;
unsigned long delayTime;
void setup() {
  Serial.begin(115200);
  Serial.println(F("BME280 test"));
  I2CBME.begin(I2C_SDA, I2C_SCL, 100000);
  bool status;
  // default settings
  // (you can also pass in a Wire library object like &Wire2)
  status = bme.begin(0x76, &I2CBME);
  if (!status) {
    Serial.println("Could not find a valid BME280 sensor, check wiring!");
    while (1);
  }
  Serial.println("-- Default Test --");
  delayTime = 1000;
  Serial.println();
}
void loop() {
  printValues();
  delay(delayTime);
}
void printValues() {
  Serial.print("Temperature = ");
  Serial.print(bme.readTemperature());
  Serial.println(" *C");
  // Convert temperature to Fahrenheit
  /*Serial.print("Temperature = ");
  Serial.print(1.8 * bme.readTemperature() + 32);
  Serial.println(" *F");*/
  Serial.print("Pressure = ");
  Serial.print(bme.readPressure() / 100.0F);
  Serial.println(" hPa");
  Serial.print("Approx. Altitude = ");
  Serial.print(bme.readAltitude(SEALEVELPRESSURE_HPA));
  Serial.println(" m");
  Serial.print("Humidity = ");
  Serial.print(bme.readHumidity());
  Serial.println(" %");
  Serial.println();
}
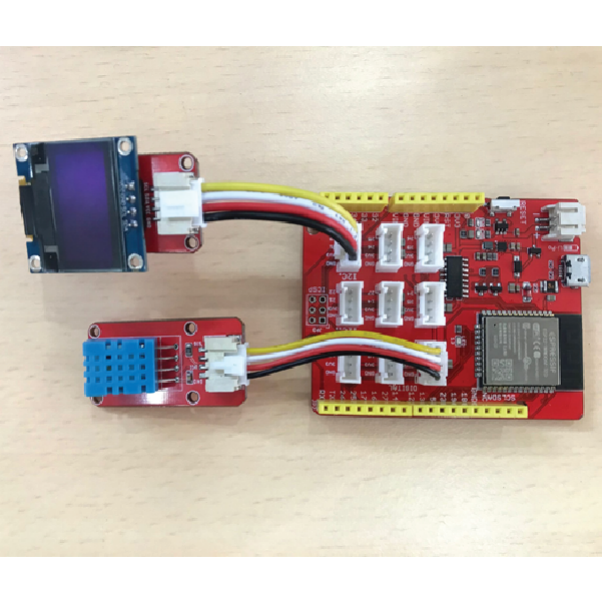
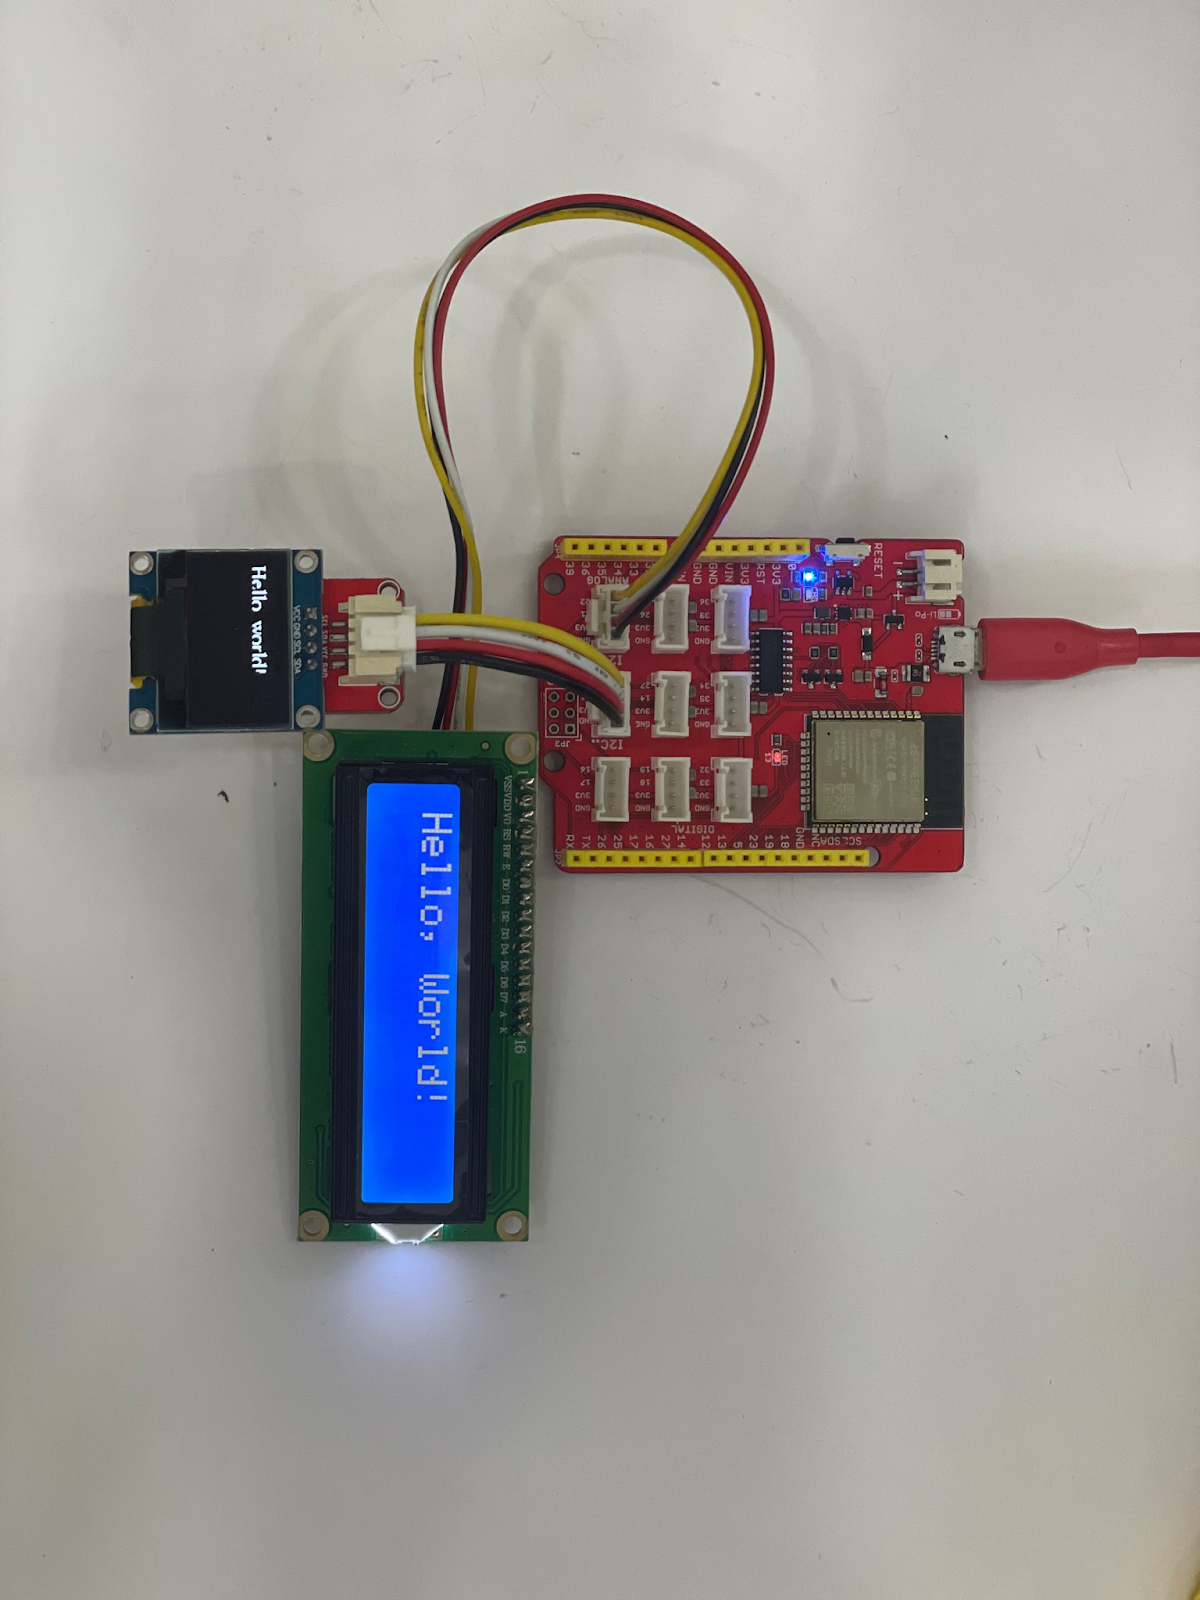
Node WiFi32 với nhiều thiết bị I2C:
Như đã đề cập trước đó, mỗi thiết bị có một địa chỉ riêng. Vì vậy có thể giao tiếp nhiều thiết bị I2C trên cùng một bus
Nạp code
#include
#include
#include
#include
#include
#define SCREEN_WIDTH 128 // OLED display width, in pixels
#define SCREEN_HEIGHT 64 // OLED display height, in pixels
int lcdColumns = 16;
int lcdRows = 2;
LiquidCrystal_I2C lcd(0x20, lcdColumns, lcdRows);
// Declaration for an SSD1306 display connected to I2C (SDA, SCL pins)
Adafruit_SSD1306 display(SCREEN_WIDTH, SCREEN_HEIGHT, &Wire , -1);
void setup() {
  // initialize LCD
  lcd.init();
  // turn on LCD backlight
  lcd.backlight();
  Serial.begin(115200);
  if(!display.begin(SSD1306_SWITCHCAPVCC, 0x3C)) { // Address 0x3D for 128x64
    Serial.println(F("SSD1306 allocation failed"));
    for(;;);
  }
  delay(2000);
  display.setFont(&FreeSerif9pt7b);
  display.clearDisplay();
  display.setTextSize(1);
  display.setTextColor(WHITE);
  display.setCursor(0, 20);
  // Display static text
  display.println("Hello, world!");
  display.display();
}
void loop() {
    // set cursor to first column, first row
  lcd.setCursor(0, 0);
  // print message
  lcd.print("Hello, World!");
  delay(1000);
  // clears the display to print new message
  lcd.clear();
  // set cursor to first column, second row
  lcd.setCursor(0,1);
  lcd.print("Hello, World!");
  delay(1000);
  lcd.clear();
}
Tổng kết,
Vậy, bạn đã biết cách tiến hành giao tiếp I2C sử dụng phần mềm Arduino IDE chưa? Hãy thử và để lại kết quả phía dưới để mọi người cùng nhau học hỏi nhé.
Để xem tất cả các bài hướng dẫn về lập trình Arduino, bạn truy cập vào đây nhé: Tổng hợp các bài hướng dẫn về Arduino.