Bài hướng dẫn hôm nay chúng tôi sẽ hướng dẫn bạn cách update OTA (lập trình qua mạng) với ESP32 bằng trình cập nhật web OTA trong Arduino IDE.
Bạn sẽ thắc mắc, OTA là gì? Thực ra, trình cập nhật web OTA là phần mềm cho phép bạn update/upload code mới lên Node Wifi32 của mình bằng trình duyệt một cách đơn giản. Bạn không cần phải thực hiện kết nối giữa Node Wifi32 và máy tính của bạn.
>> Xem thêm: [PDF] Lập trình Arduino là gì? Tài liệu học Arduino miễn phí 2021
Lập trình và update OTA rất hữu ích khi bạn cần cập nhật code lên các board Node Wifi32 không dễ dàng truy cập. Nhược điểm duy nhất của Trình cập nhật web OTA là bạn phải thêm code cho OTA trong mỗi sketch mà bạn upload để có thể sử dụng và update OTA trong tương lai.
Trong ví dụ dưới đây, chúng tôi sẽ lập trình Node Wifi32 trên một mạng cục bộ.
Mục lục
Chuẩn bị trước khi thực hành update OTA
Trước khi tiếp tục với hướng dẫn này, bạn nên cài đặt tiện ích bổ sung ESP32 trong IDE Arduino của mình. Thực hiện theo một trong các hướng dẫndưới đây để cài đặt ESP32 trên Arduino IDE, nếu bạn chưa cài đặt:
Trình Cập Nhật Web ESP32 OTA
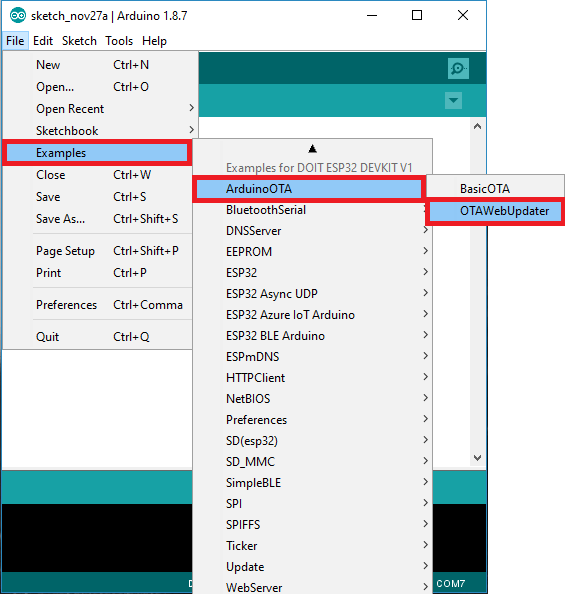
Khi bạn cài đặt tiện ích bổ sung Esp32 cho Arduino IDE, nó sẽ tự động cài đặt thư viện ArduinoOTA. Đi tới File > Example > ArduinoOTA > OTAWebUpdater.
Đoạn code sau sẽ hiện lên như sau.
/*
 * OTAWebUpdater.ino Example from ArduinoOTA Library
 * Rui Santos
 * Complete Project Details https://randomnerdtutorials.com
 */

#include <WiFi.h>
#include <WiFiClient.h>
#include <WebServer.h>
#include <ESPmDNS.h>
#include <Update.h>

const char* host = "NodeWifi32";
const char* ssid = "REPLACE_WITH_YOUR_SSID";
const char* password = "REPLACE_WITH_YOUR_PASSWORD";

WebServer server(80);

/*
 * Login page
 */
const char* loginIndex =
 "<form name='loginForm'>"
    "<table width='20%' bgcolor='A09F9F' align='center'>"
        "<tr>"
            "<td colspan=2>"
                "<center><font size=4><b>ESP32 Login Page</b></font></center>"
                "<br>"
            "</td>"
            "<br>"
            "<br>"
        "</tr>"
        "<td>Username:</td>"
        "<td><input type='text' size=25 name='userid'><br></td>"
        "</tr>"
        "<br>"
        "<br>"
        "<tr>"
            "<td>Password:</td>"
            "<td><input type='Password' size=25 name='pwd'><br></td>"
            "<br>"
            "<br>"
        "</tr>"
        "<tr>"
            "<td><input type='submit' onclick='check(this.form)' value='Login'></td>"
        "</tr>"
    "</table>"
"</form>"
"<script>"
    "function check(form)"
    "{"
    "if(form.userid.value=='admin' && form.pwd.value=='admin')"
    "{"
    "window.open('/serverIndex')"
    "}"
    "else"
    "{"
    " alert('Error Password or Username')/*displays error message*/"
    "}"
    "}"
"</script>";

/*
 * Server Index Page
 */

const char* serverIndex =
"<script src='https://ajax.googleapis.com/ajax/libs/jquery/3.2.1/jquery.min.js'></script>"
"<form method='POST' action='#' enctype='multipart/form-data' id='upload_form'>"
   "<input type='file' name='update'>"
        "<input type='submit' value='Update'>"
    "</form>"
 "<div id='prg'>progress: 0%</div>"
 "<script>"
  "$('form').submit(function(e){"
  "e.preventDefault();"
  "var form = $('#upload_form')[0];"
  "var data = new FormData(form);"
  " $.ajax({"
  "url: '/update',"
  "type: 'POST',"
  "data: data,"
  "contentType: false,"
  "processData:false,"
  "xhr: function() {"
  "var xhr = new window.XMLHttpRequest();"
  "xhr.upload.addEventListener('progress', function(evt) {"
  "if (evt.lengthComputable) {"
  "var per = evt.loaded / evt.total;"
  "$('#prg').html('progress: ' + Math.round(per*100) + '%');"
  "}"
  "}, false);"
  "return xhr;"
  "},"
  "success:function(d, s) {"
  "console.log('success!')"
 "},"
 "error: function (a, b, c) {"
 "}"
 "});"
 "});"
 "</script>";

/*
 * setup function
 */
void setup(void) {
  Serial.begin(115200);

  // Connect to WiFi network
  WiFi.begin(ssid, password);
  Serial.println("");

  // Wait for connection
  while (WiFi.status() != WL_CONNECTED) {
    delay(500);
    Serial.print(".");
  }
  Serial.println("");
  Serial.print("Connected to ");
  Serial.println(ssid);
  Serial.print("IP address: ");
  Serial.println(WiFi.localIP());

  /*use mdns for host name resolution*/
  if (!MDNS.begin(host)) { //http://esp32.local
    Serial.println("Error setting up MDNS responder!");
    while (1) {
      delay(1000);
    }
  }
  Serial.println("mDNS responder started");
  /*return index page which is stored in serverIndex */
  server.on("/", HTTP_GET, []() {
    server.sendHeader("Connection", "close");
    server.send(200, "text/html", loginIndex);
  });
  server.on("/serverIndex", HTTP_GET, []() {
    server.sendHeader("Connection", "close");
    server.send(200, "text/html", serverIndex);
  });
  /*handling uploading firmware file */
  server.on("/update", HTTP_POST, []() {
    server.sendHeader("Connection", "close");
    server.send(200, "text/plain", (Update.hasError()) ? "FAIL" : "OK");
    ESP.restart();
  }, []() {
    HTTPUpload& upload = server.upload();
    if (upload.status == UPLOAD_FILE_START) {
      Serial.printf("Update: %s\n", upload.filename.c_str());
      if (!Update.begin(UPDATE_SIZE_UNKNOWN)) { //start with max available size
        Update.printError(Serial);
      }
    } else if (upload.status == UPLOAD_FILE_WRITE) {
      /* flashing firmware to ESP*/
      if (Update.write(upload.buf, upload.currentSize) != upload.currentSize) {
        Update.printError(Serial);
      }
    } else if (upload.status == UPLOAD_FILE_END) {
      if (Update.end(true)) { //true to set the size to the current progress
        Serial.printf("Update Success: %u\nRebooting...\n", upload.totalSize);
      } else {
        Update.printError(Serial);
      }
    }
  });
  server.begin();
}

void loop(void) {
  server.handleClient();
  delay(1);
}
Ví dụ, OTAWebUpdater cho Node Wifi32 tạo một máy chủ web không đồng bộ. Đây là nơi bạn có thể tải mã mới lên bảng của mình mà không cần kết nối nối tiếp.
Upload code lên board Node Wifi32 của bạn. Đừng quên nhập thông tin đăng nhập mạng của bạn và chọn đúng bo mạch và cổng nối tiếp nhé.

Sau khi tải mã lên, hãy mở Serial Monitor ở tốc độ truyền 115200, nhấn nút kích hoạt Node Wifi32. Lúc này, bạn sẽ nhận được địa chỉ IP Node Wifi32:
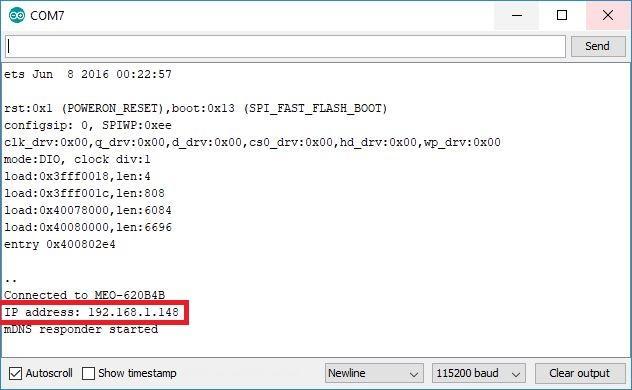
Giờ đây, bạn có thể upload code lên Node Wifi32 qua mạng bằng trình duyệt trên mạng cục bộ của mình.
Để kiểm tra Trình cập nhật web OTA, bạn có thể ngắt kết nối Node Wifi32 khỏi máy tính của mình và cấp nguồn cho nó bằng cách sử dụng pin dự phòng (Đây chỉ là một lựa chọn thay thế, chúng tôi đề xuất điều này để đề phòng tình huống Node Wifi32 không kết nối được với máy tính của bạn).
Cập Nhật Code Mới Bằng Trình Cập Nhật Web OTA
Mở trình duyệt trong mạng của bạn và nhập địa chỉ IP Node Wifi32. Bạn sẽ thấy được như hình:

Nhập tên người dùng và mật khẩu:
- Username: admin
- Password: admin
Bạn có thể thay đổi tên người dùng và mật khẩu trên code.
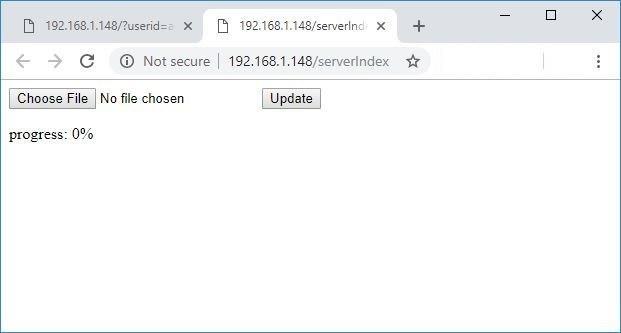
Lưu ý: Sau khi nhập Username và Passwork, bạn sẽ được chuyển hướng đến URL / serverIndex . Bạn không cần nhập tên người dùng và mật khẩu để truy cập URL / serverIndex . Vì vậy, nếu ai đó biết URL để tải lên mã mới, tên người dùng và mật khẩu sẽ không bảo vệ trang web khỏi bị người khác truy cập.
Một tab mới sẽ mở trên URL / serverIndex . Trang này cho phép bạn tải mã mới lên Node Wifi32 của mình. Bạn nên tải lên các tệp .bin (chúng tôi sẽ xem cách thực hiện điều đó trong giây lát).
Chuẩn bị Sketch Mới
Khi Upload bản phác thảo mới qua mạng, bạn cần lưu ý rằng bạn cần thêm code cho OTA trong bản phác thảo mới của mình. Đây là cách để bạn có thể ghi đè bất kỳ bản phác thảo nào bằng một bản phác thảo mới trong tương lai. Vì vậy, chúng tôi khuyên bạn nên sửa đổi bản phác thảo OTAWebUpdater để bao gồm code của riêng bạn.
Vì mục đích học tập, hãy Uplaod một code mới nhấp nháy đèn LED (không có độ trễ). Sao chép code bên dưới vào IDE Arduino.
/*
 * Rui Santos
 * Complete Project Details https://randomnerdtutorials.com
 */

#include <WiFi.h>
#include <WiFiClient.h>
#include <WebServer.h>
#include <ESPmDNS.h>
#include <Update.h>

const char* host = "NodeWifi32";
const char* ssid = "REPLACE_WITH_YOUR_SSID";
const char* password = "REPLACE_WITH_YOUR_PASSWORD";

//variabls to blink without delay:
const int led = 2;
unsigned long previousMillis = 0;        // will store last time LED was updated
const long interval = 1000;           // interval at which to blink (milliseconds)
int ledState = LOW;             // ledState used to set the LED

WebServer server(80);

/*
 * Login page
 */

const char* loginIndex =
 "<form name='loginForm'>"
    "<table width='20%' bgcolor='A09F9F' align='center'>"
        "<tr>"
            "<td colspan=2>"
                "<center><font size=4><b>ESP32 Login Page</b></font></center>"
                "<br>"
            "</td>"
            "<br>"
            "<br>"
        "</tr>"
        "<td>Username:</td>"
        "<td><input type='text' size=25 name='userid'><br></td>"
        "</tr>"
        "<br>"
        "<br>"
        "<tr>"
            "<td>Password:</td>"
            "<td><input type='Password' size=25 name='pwd'><br></td>"
            "<br>"
            "<br>"
        "</tr>"
        "<tr>"
            "<td><input type='submit' onclick='check(this.form)' value='Login'></td>"
        "</tr>"
    "</table>"
"</form>"
"<script>"
    "function check(form)"
    "{"
    "if(form.userid.value=='admin' && form.pwd.value=='admin')"
    "{"
    "window.open('/serverIndex')"
    "}"
    "else"
    "{"
    " alert('Error Password or Username')/*displays error message*/"
    "}"
    "}"
"</script>";

/*
 * Server Index Page
 */

const char* serverIndex =
"<script src='https://ajax.googleapis.com/ajax/libs/jquery/3.2.1/jquery.min.js'></script>"
"<form method='POST' action='#' enctype='multipart/form-data' id='upload_form'>"
   "<input type='file' name='update'>"
        "<input type='submit' value='Update'>"
    "</form>"
 "<div id='prg'>progress: 0%</div>"
 "<script>"
  "$('form').submit(function(e){"
  "e.preventDefault();"
  "var form = $('#upload_form')[0];"
  "var data = new FormData(form);"
  " $.ajax({"
  "url: '/update',"
  "type: 'POST',"
  "data: data,"
  "contentType: false,"
  "processData:false,"
  "xhr: function() {"
  "var xhr = new window.XMLHttpRequest();"
  "xhr.upload.addEventListener('progress', function(evt) {"
  "if (evt.lengthComputable) {"
  "var per = evt.loaded / evt.total;"
  "$('#prg').html('progress: ' + Math.round(per*100) + '%');"
  "}"
  "}, false);"
  "return xhr;"
  "},"
  "success:function(d, s) {"
  "console.log('success!')"
 "},"
 "error: function (a, b, c) {"
 "}"
 "});"
 "});"
 "</script>";

/*
 * setup function
 */
void setup(void) {
  pinMode(led, OUTPUT);

  Serial.begin(115200);

  // Connect to WiFi network
  WiFi.begin(ssid, password);
  Serial.println("");

  // Wait for connection
  while (WiFi.status() != WL_CONNECTED) {
    delay(500);
    Serial.print(".");
  }
  Serial.println("");
  Serial.print("Connected to ");
  Serial.println(ssid);
  Serial.print("IP address: ");
  Serial.println(WiFi.localIP());

  /*use mdns for host name resolution*/
  if (!MDNS.begin(host)) { //http://esp32.local
    Serial.println("Error setting up MDNS responder!");
    while (1) {
      delay(1000);
    }
  }
  Serial.println("mDNS responder started");
  /*return index page which is stored in serverIndex */
  server.on("/", HTTP_GET, []() {
    server.sendHeader("Connection", "close");
    server.send(200, "text/html", loginIndex);
  });
  server.on("/serverIndex", HTTP_GET, []() {
    server.sendHeader("Connection", "close");
    server.send(200, "text/html", serverIndex);
  });
  /*handling uploading firmware file */
  server.on("/update", HTTP_POST, []() {
    server.sendHeader("Connection", "close");
    server.send(200, "text/plain", (Update.hasError()) ? "FAIL" : "OK");
    ESP.restart();
  }, []() {
    HTTPUpload& upload = server.upload();
    if (upload.status == UPLOAD_FILE_START) {
      Serial.printf("Update: %s\n", upload.filename.c_str());
      if (!Update.begin(UPDATE_SIZE_UNKNOWN)) { //start with max available size
        Update.printError(Serial);
      }
    } else if (upload.status == UPLOAD_FILE_WRITE) {
      /* flashing firmware to ESP*/
      if (Update.write(upload.buf, upload.currentSize) != upload.currentSize) {
        Update.printError(Serial);
      }
    } else if (upload.status == UPLOAD_FILE_END) {
      if (Update.end(true)) { //true to set the size to the current progress
        Serial.printf("Update Success: %u\nRebooting...\n", upload.totalSize);
      } else {
        Update.printError(Serial);
      }
    }
  });
  server.begin();
}

void loop(void) {
  server.handleClient();
  delay(1);

  //loop to blink without delay
  unsigned long currentMillis = millis();

  if (currentMillis - previousMillis >= interval) {
    // save the last time you blinked the LED
    previousMillis = currentMillis;

    // if the LED is off turn it on and vice-versa:
    ledState = not(ledState);

    // set the LED with the ledState of the variable:
    digitalWrite(led, ledState);
  }
}
Như bạn có thể thấy, chúng tôi đã thêm mã “blink without delay” vào code OTAWebUpdater, để chúng tôi có thể cập nhật sau này.
Sau khi sao chép code vào Arduino IDE, bạn nên tạo tệp .bin .
Tạo tệp .bin trong Arduino IDE
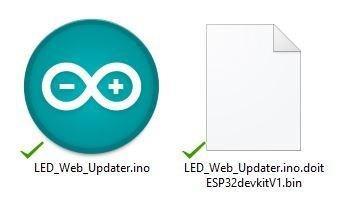
Lưu bản phác thảo của bạn dưới dạng LED_Web_Updater .
Để tạo tệp .bin từ bản phác thảo của bạn, hãy đi tới Sketch > Export compiled Binary

Một file mới trên bản Sketch thư mục sẽ được tạo. Đi tới Sketch > Show Sketch Folder. Bạn nên có hai file trong thư mục Sketch của mình: file .ino và file .bin . Bạn nên tải lên file .bin bằng Trình cập nhật web OTA.
Tải một bản Sketch mới qua mạng lên NodeWifi32
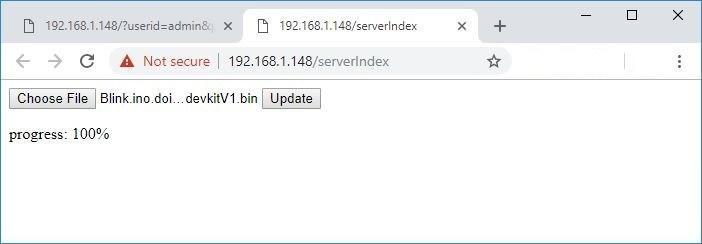
Trong trình duyệt của bạn, trên trang Node Wifi32 OTA Web Updater, nhấp vào nút Choose File . Chọn tệp .bin đã tạo trước đó, sau đó bấm Update.
Sau một vài giây, code sẽ được upload thành công.
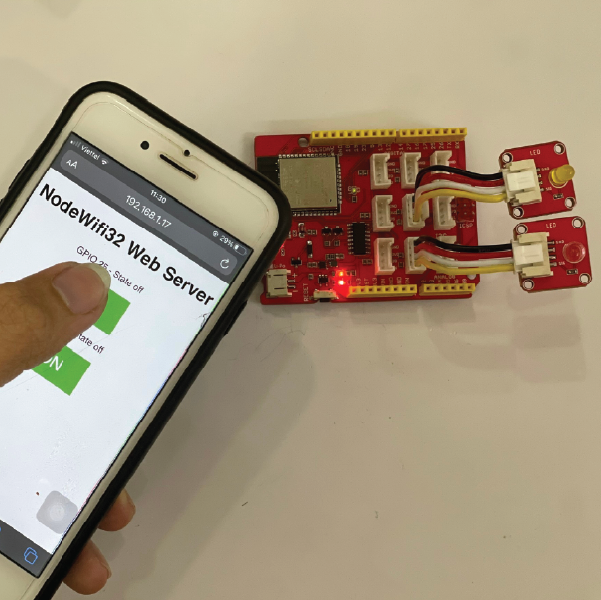
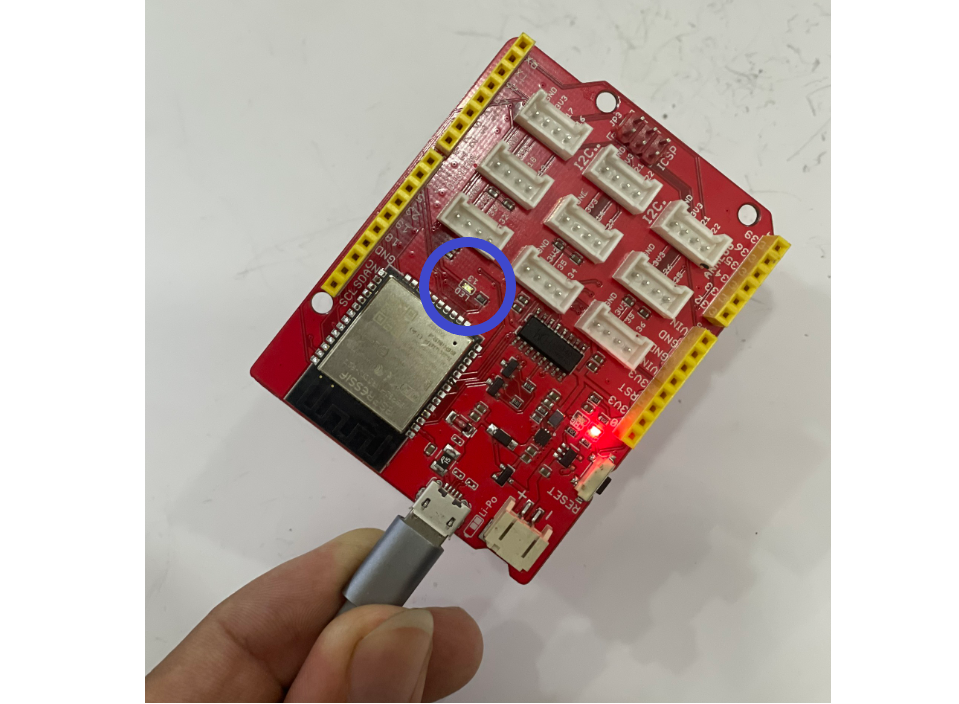
Đèn LED tích hợp Node Wifi32 sẽ nhấp nháy.
Kết luận
Cập nhật qua mạng và update OTA trên rất hữu ích để tải mã mới lên board Node Wifi32 của bạn. Code OTA Web Updater sẽ tạo một máy chủ web mà bạn có thể truy cập để upload code mới lên board Node Wifi32 của mình bằng trình duyệt web trên mạng cục bộ của bạn.
Nếu bạn có bất kỳ ý kiến đóng góp hoặc thắc mắc gì, bạn có thể để lại comment phía dưới, hoặc liên hệ với chúng tôi qua Fanpage tại đây để được hỗ trợ nhé!